
you’re a podcaster who’s been recording your show at CBS Radio, a venerable, if not unglamorous spot. One day, you’re instead offered the chance to start recording in a Beverly Hills home. The house has a pool, free food for the talent — that means you! — and the space to host blowout events. You know what you’d choose, and you know what podcaster Norm Steele chose: the Hollywood life.
How to allocate more RAM to specific app or program in Windows 10

Sometimes, it feels like lagging is primary nature rather than good performance on the Windows 10 operating system after using it for a while or keeping multiple programs open. Even having multiple tabs on the web browser slows down the performance of a Windows device.


This is mainly happening due to the allotment of RAM on the device for that program. If you are facing such an issue then you can certainly fix this issue by optimizing the memory usage allotment on your Windows device. Here, we will show you how to allocate more RAM to specific apps in Windows 10 to optimize memory usage in your computer. You will also learn how to increase or reduce RAM cache in Google Chrome and Mozilla Firefox.
For functioning, any program needs CPU, RAM, and GPU. CPU is required to load up the program in the primary headspace and it operates it hundreds or thousands of algorithmic operations while the RAM helps the program to retain the memory so that it is easily accessible and load instantly. GPU rather has a minimal role rather than above as it helps to operate the graphical functions of the program.
If you are facing issues with the browsers like Firefox, Chrome, Opera, Edge, etc. then the best way to fix those lagging and dipped performance by allocating more RAM to the program.
Allocating More RAM to Specific App or Program in Windows 10
Generally, Windows does a good job of deciding the memory allocation for each app and program but if you are facing any issue then you can override and prioritize a specific app or program in Windows 10. Here is a step-by-step guide for the same.
Method 1: Using Task Manager
The simplest way to allocate more memory or RAM to any specific app or program in Windows is by elevating its priority.
Step 1: Open the Task Manager app on your Windows 10 computer by pressing CTRL + SHIFT + ESC keys on your keyboard.
Step 2: After opening the Task Manager, go to the "Details Tab".
Step 3: Now right-click on the application or program that you want to allocate more RAM. In the context menu, hover to the 'Set Priority' and choose 'High' or 'Above Normal' based on the priority.

Step 4: Once you make the changes, you will be prompted to confirm it by clicking on the "Change Priority" in the confirmation box.
This would ensure that Windows 10 gives higher priority to that app or program over the other application which is operating simultaneously.
Method 2: Using Windows Context Menu
You can also specify the amount of RAM for each program by using this method. It works for most of the apps or programs but here we’re going to set (increase or decrease) RAM cache in Google Chrome.
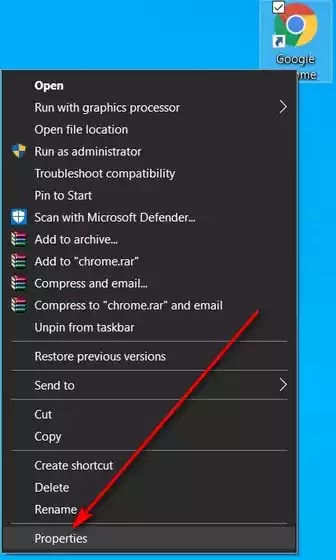
Step 1: Right-click on the Chrome shortcut on your desktop of Windows 10(if available). Now select ‘Properties’.

Note: If there’s no Chrome shortcut on the desktop, right-click on Google Chrome in the Start Menu and select ‘More > Open File Location’. Now right-click on the shortcut in the opened folder and select ‘Properties’.
Step 2: Now select the ‘Shortcut’ tab, find the ‘Target’ field, and copy & paste –disk-cache-size=1073741824 at the end of the existing entry. Click ‘OK’.

This would help to allocate up to 1073741824 bytes (1GB) of RAM cache to Google Chrome. (You can select any value of your choice depending on available memory in your computer to increase or reduce RAM cache in Google Chrome)
Method 3: Using App Settings
The best way to allocate memory to an app or program (either increase or decrease) is to specify the amount from within that app’s or program’s settings. However, this won’t work for all apps and when it does, the process varies from one app or program to other. Here, we are going to set (increase or decrease) RAM cache in Mozilla Firefox.
Step 1: In order to manually set RAM cache in Mozilla Firefox, go to about:config in the browser’s address bar and press Enter. If you get a warning, dismiss it to access advanced options.

Step 2: Now search for browser.cache in the about:config search field. Find browser.cache.disk.enable from the results, and double click on it to change its value to false.

Step 3: Find browser.cache.memory.enable where it should be ‘true by default’ which means that disk cache is now turned off and the memory cache is turned on.

Step 4: Find browser.cache.memory.capacity which should have the default value of “-1”. Hit the ‘Edit’ button (pen icon) to change its value.

Step 5: Enter the desired value to increase or decrease RAM cache in Mozilla Firefox. Finally, click on the blue tick mark on the right to save your settings.

Note: The memory cache you enter must be in kilobytes. So, to allocate 1GB, the entry should be 1048576. The default value of “-1” lets Firefox choose the size of its cache depending on your computer’s installed RAM capacity.
Risk of Allocating the Wrong Amount of RAM
You are unlikely to damage your Windows device by specifying too much or too little RAM to any app or program. However, it could cause a program to crash or become unusable under certain conditions due to ‘stack overflow error’ which happens when the call stack memory is exceeded. It should also be noted that certain apps or programs are coded to use a specific amount of RAM so you might not see a great difference by allocating more memory to those programs.
Allocating More RAM to Specific App or Program to Improve System Performance in Windows 10
That's how you can allocate more RAM to the app or program, you want or need. This will ensure that your Windows device gives higher priority to the program over the other running applications or programs on your Windows device. This function comes in very handy for those who are using older Windows devices or an entry-level device as the new models and high-end Windows devices come with more memory but you can also use it there to prioritize things. Using the tutorial above, you should be able to easily allocate more RAM to specific apps to speed up your Windows 10 computer.
-
Lorem ipsum dolor sit amet, consectetur adipiscing elit. Proin vestibulum dignissim diam, et efficitur felis commodo et. Mauris vel diam pellentesque lorem lacinia luctus. Nulla quam magna, pharetra in ultrices at, condimentum id tellus. Sed suscipit sapien sed turpis ultrices viverra.
Ut quis dui sed odio sollicitudin fermentum. Aliquam vitae metus laoreet, dapibus enim sit amet, feugiat lorem. Sed in dui purus.
-
Morbi turpis arcu, eleifend a tortor quis, sagittis dapibus ipsum. Vestibulum in imperdiet arcu, eget fringilla libero. Aenean commodo, felis id fermentum pellentesque, risus elit efficitur augue, at lobortis libero ipsum quis nulla. Suspendisse imperdiet magna at tellus feugiat rhoncus.
-
Donec in massa vitae quam lobortis cursus. Donec tincidunt interdum ex ut finibus. Praesent at dui scelerisque, laoreet justo eu, egestas justo. Nullam dapibus, dolor quis blandit suscipit, massa odio hendrerit neque, at fermentum dolor tellus ac justo.
1 comment